
Bagi para pengembang aplikasi Android, sering kali ingin membuat UI dashboard dengan layout grid yang sederhana sehingga aplikasi memiliki tampilan yang unik. Tampilan grid bisa digunakan untuk berbagai aktivitas, bisa sebagai tampilan utama, tampilan halaman pengaturan maupun halaman lainnya.
Pada Android Studio versi terbaru, banyak cara yang bisa dilakukan untuk membuat UI dashboard grid, salah satunya dengan menggunakan LinearLayout. Pada tutorial kali ini kita akan belajar, membuat grid layout menggunakan LinearLayot yang nantinya ditambahkan elemen background kustom sesuai dengan yang di inginkan.
Berikut ini langkah-langkah mudah cara membuat UI Dashboard grid sederhana di Android Studio yang bisa Anda coba lakukan.
Membuat UI Dashboard Grid Sederhana di Android Studio
Pertama buat project baru di Android Studio atau jika Anda sudah memiliki project yang membutuhkan tampilan garid bisa langsung melanjutkan project tersebut.
Baca juga: Tutorial Mengatur Dukungan Ukuran Halaman 16 KB Android
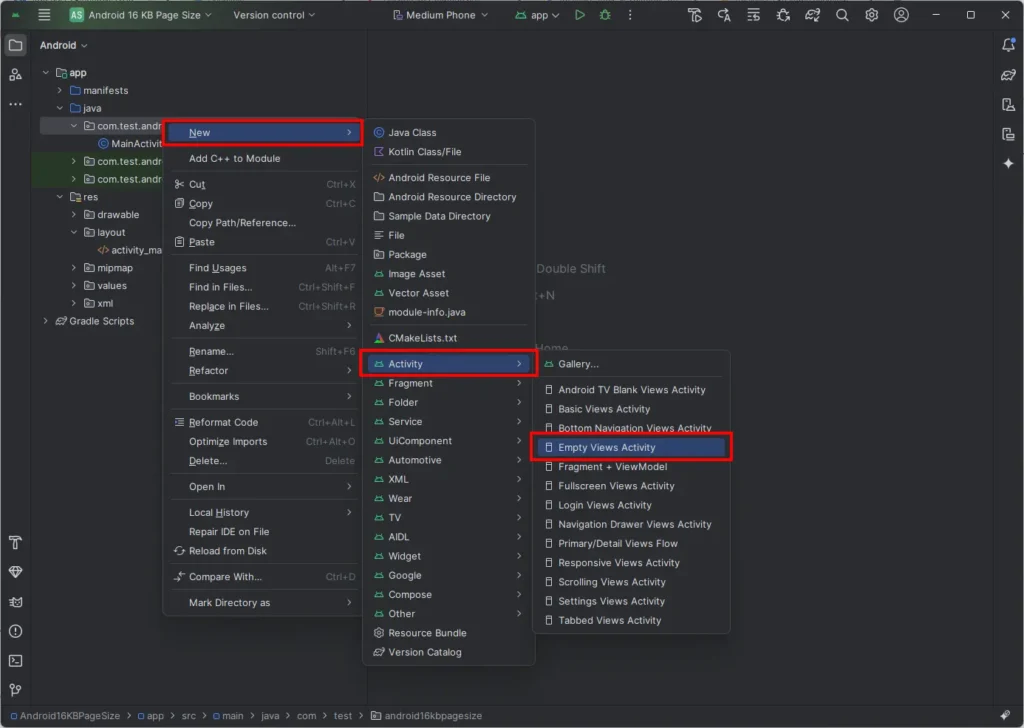
1. Buat Aktivitas Baru di Android Studio
Pada Android Studio buat aktivitas baru, Java > Package > Klik Kanan > New > Activity > Emty Views Activity > Buat nama untuk aktivitas “HomeActivity” ceklis bagian Generate a Layout File lalu ketuk Finish.
2. Buat Icon Menu
Agar tampilan dashboard grid terlihat lebih menarik, Anda bisa menambahkan icon sesuai dengan yang di inginkan. Untuk membuat icon bisa langsung menggunakan library icon di Android Studio.
Buka res > drawable > klik kanan > New > Vector Assets > Clip art > pilih icon yang ingin digunakan sesuai dengan kebutuhan lalu klik Finish.
Baca juga: 7 Proxy Video Terbaik untuk Pengguna di Indonesia
3. Buat Background Gradient
Untuk membuat tampilan dashboard lebih menarik, kita akan membuat background gradient melalui Drawable Resource res > drawable > klik kanan > Drawable Resource File > beri nama “background” lalu salin kode XML berikut ini.
<?xml version="1.0" encoding="utf-8"?>
<shape xmlns:android="http://schemas.android.com/apk/res/android"
    android:shape="rectangle">
    <gradient
        android:startColor="#3328dc"
        android:endColor="#a643ec"
        android:angle="90" />
</shape>
3. Buat Background Curved Layout Grid
Selanjutnya kita perlu membuat background curved untuk kebutuhan grid layout yang akan kita buat, res > drawable > klik kanan > Drawable Resource File > beri nama “curved_background”, salin kode berikut ini.
<?xml version="1.0" encoding="utf-8"?>
<shape xmlns:android="http://schemas.android.com/apk/res/android">
<solid android:color="#33FFFFFF" /> <!-- Replace with your desired background color -->
<corners android:radius="25dp" /> <!-- Adjust the radius to control the curve -->
<stroke
android:width="1dp"
android:color="#99FFFFFF" />
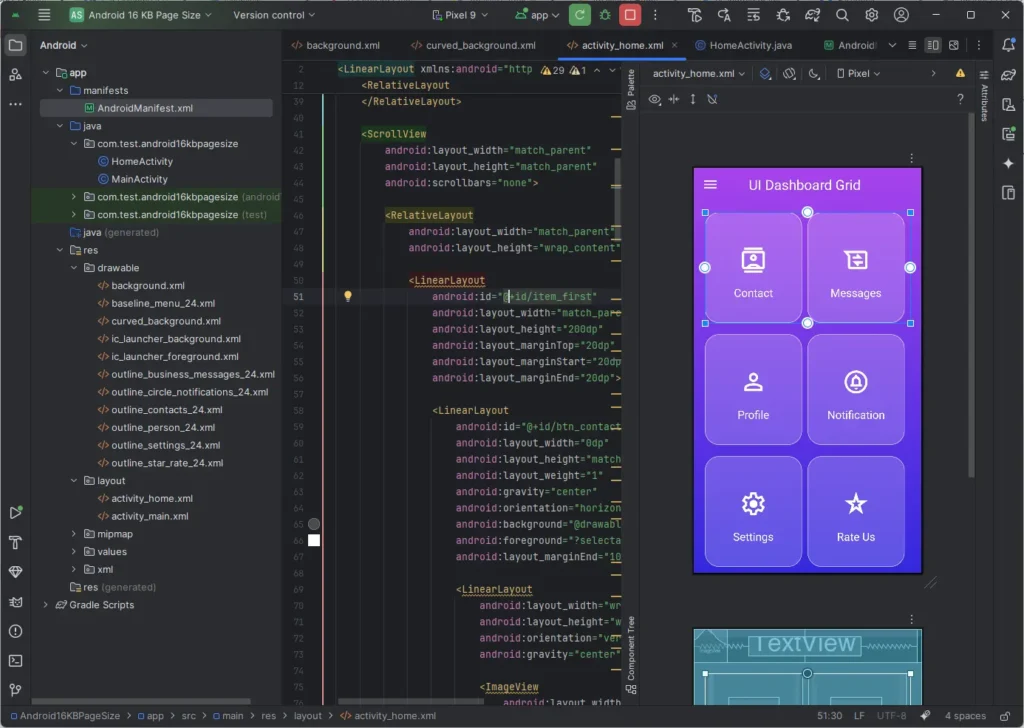
</shape>4. Edit Layout activity_home.xml
Pada Android Studio buka folder res > layout > activity_home.xml lalu salin kode XML grid layout berikut ini.
<?xml version="1.0" encoding="utf-8"?>
<LinearLayout xmlns:android="http://schemas.android.com/apk/res/android"
    xmlns:app="http://schemas.android.com/apk/res-auto"
    xmlns:tools="http://schemas.android.com/tools"
    android:id="@+id/main"
    android:layout_width="match_parent"
    android:layout_height="match_parent"
    android:orientation="vertical"
    android:background="@drawable/background"
    tools:context=".HomeActivity">

    <RelativeLayout
        android:id="@+id/appbar"
        android:layout_width="match_parent"
        android:layout_height="wrap_content"
        android:layout_marginEnd="10dp">

        <ImageView
            android:id="@+id/back_btn"
            android:layout_width="60dp"
            android:layout_height="60dp"
            android:padding="15dp"
            android:src="@drawable/baseline_menu_24"
            android:background="?selectableItemBackground"
            app:tint="@color/white"
            android:layout_centerVertical="true"
            />

        <TextView
            android:layout_width="wrap_content"
            android:layout_height="wrap_content"
            android:textColor="@color/white"
            android:text="UI Dashboard Grid"
            android:layout_centerVertical="true"
            android:layout_centerHorizontal="true"
            android:layout_marginStart="60dp"
            android:textSize="25sp" />

    </RelativeLayout>

    <ScrollView
        android:layout_width="match_parent"
        android:layout_height="match_parent"
        android:scrollbars="none">

        <RelativeLayout
            android:layout_width="match_parent"
            android:layout_height="wrap_content">

            <LinearLayout
                android:id="@+id/item_first"
                android:layout_width="match_parent"
                android:layout_height="200dp"
                android:layout_marginTop="20dp"
                android:layout_marginStart="20dp"
                android:layout_marginEnd="20dp">

                <LinearLayout
                    android:id="@+id/btn_contact"
                    android:layout_width="0dp"
                    android:layout_height="match_parent"
                    android:layout_weight="1"
                    android:gravity="center"
                    android:orientation="horizontal"
                    android:background="@drawable/curved_background"
                    android:foreground="?selectableItemBackground"
                    android:layout_marginEnd="10dp">

                    <LinearLayout
                        android:layout_width="wrap_content"
                        android:layout_height="wrap_content"
                        android:orientation="vertical"
                        android:gravity="center">

                        <ImageView
                            android:layout_width="50dp"
                            android:layout_height="50dp"
                            android:src="@drawable/outline_contacts_24"
                            app:tint="@color/white"
                            android:layout_margin="20dp" />

                        <TextView
                            android:layout_width="wrap_content"
                            android:layout_height="wrap_content"
                            android:text="Contact"
                            android:textSize="20sp"
                            android:textColor="@color/white" />

                    </LinearLayout>
                </LinearLayout>

                <LinearLayout
                    android:id="@+id/btn_message"
                    android:layout_width="0dp"
                    android:layout_height="match_parent"
                    android:layout_weight="1"
                    android:gravity="center"
                    android:orientation="horizontal"
                    android:background="@drawable/curved_background"
                    android:foreground="?selectableItemBackground"
                    android:layout_marginEnd="10dp">

                    <LinearLayout
                        android:layout_width="wrap_content"
                        android:layout_height="wrap_content"
                        android:orientation="vertical"
                        android:gravity="center">

                        <ImageView
                            android:layout_width="50dp"
                            android:layout_height="50dp"
                            android:src="@drawable/outline_business_messages_24"
                            app:tint="@color/white"
                            android:layout_margin="20dp" />

                        <TextView
                            android:layout_width="wrap_content"
                            android:layout_height="wrap_content"
                            android:text="Messages"
                            android:textSize="20sp"
                            android:textColor="@color/white" />

                    </LinearLayout>
                </LinearLayout>
            </LinearLayout>

            <LinearLayout
                android:id="@+id/item_second"
                android:layout_width="match_parent"
                android:layout_height="200dp"
                android:layout_below="@+id/item_first"
                android:layout_marginTop="20dp"
                android:layout_marginStart="20dp"
                android:layout_marginEnd="20dp">

                <LinearLayout
                    android:id="@+id/btn_profile"
                    android:layout_width="0dp"
                    android:layout_height="match_parent"
                    android:layout_weight="1"
                    android:gravity="center"
                    android:background="@drawable/curved_background"
                    android:foreground="?selectableItemBackground"
                    android:orientation="horizontal"
                    android:layout_marginEnd="10dp">

                    <LinearLayout
                        android:layout_width="wrap_content"
                        android:layout_height="wrap_content"
                        android:orientation="vertical"
                        android:gravity="center">

                        <ImageView
                            android:layout_width="50dp"
                            android:layout_height="50dp"
                            android:src="@drawable/outline_person_24"
                            app:tint="@color/white"
                            android:layout_margin="20dp" />

                        <TextView
                            android:layout_width="wrap_content"
                            android:layout_height="wrap_content"
                            android:text="Profile"
                            android:textSize="20sp"
                            android:textColor="@color/white" />

                    </LinearLayout>
                </LinearLayout>

                <LinearLayout
                    android:id="@+id/btn_notification"
                    android:layout_width="0dp"
                    android:layout_height="match_parent"
                    android:layout_weight="1"
                    android:gravity="center"
                    android:background="@drawable/curved_background"
                    android:foreground="?selectableItemBackground"
                    android:orientation="horizontal"
                    android:layout_marginEnd="10dp">

                    <LinearLayout
                        android:layout_width="wrap_content"
                        android:layout_height="wrap_content"
                        android:orientation="vertical"
                        android:gravity="center">

                        <ImageView
                            android:layout_width="50dp"
                            android:layout_height="50dp"
                            android:src="@drawable/outline_circle_notifications_24"
                            app:tint="@color/white"
                            android:layout_margin="20dp" />

                        <TextView
                            android:layout_width="wrap_content"
                            android:layout_height="wrap_content"
                            android:text="Notification"
                            android:textSize="20sp"
                            android:textColor="@color/white" />

                    </LinearLayout>
                </LinearLayout>
            </LinearLayout>

            <LinearLayout
                android:id="@+id/item_tri"
                android:layout_width="match_parent"
                android:layout_height="200dp"
                android:layout_below="@+id/item_second"
                android:layout_marginTop="20dp"
                android:layout_marginStart="20dp"
                android:layout_marginEnd="20dp">

                <LinearLayout
                    android:id="@+id/btn_settings"
                    android:layout_width="0dp"
                    android:layout_height="match_parent"
                    android:layout_weight="1"
                    android:gravity="center"
                    android:background="@drawable/curved_background"
                    android:foreground="?selectableItemBackground"
                    android:orientation="horizontal"
                    android:layout_marginEnd="10dp">

                    <LinearLayout
                        android:layout_width="wrap_content"
                        android:layout_height="wrap_content"
                        android:orientation="vertical"
                        android:gravity="center">

                        <ImageView
                            android:layout_width="50dp"
                            android:layout_height="50dp"
                            android:src="@drawable/outline_settings_24"
                            app:tint="@color/white"
                            android:layout_margin="20dp" />

                        <TextView
                            android:layout_width="wrap_content"
                            android:layout_height="wrap_content"
                            android:text="Settings"
                            android:textSize="20sp"
                            android:textColor="@color/white" />

                    </LinearLayout>
                </LinearLayout>

                <LinearLayout
                    android:id="@+id/btn_rate"
                    android:layout_width="0dp"
                    android:layout_height="match_parent"
                    android:layout_weight="1"
                    android:gravity="center"
                    android:background="@drawable/curved_background"
                    android:foreground="?selectableItemBackground"
                    android:orientation="horizontal"
                    android:layout_marginEnd="10dp">

                    <LinearLayout
                        android:layout_width="wrap_content"
                        android:layout_height="wrap_content"
                        android:orientation="vertical"
                        android:gravity="center">

                        <ImageView
                            android:layout_width="50dp"
                            android:layout_height="50dp"
                            android:src="@drawable/outline_star_rate_24"
                            app:tint="@color/white"
                            android:layout_margin="20dp" />

                        <TextView
                            android:layout_width="wrap_content"
                            android:layout_height="wrap_content"
                            android:text="Rate Us"
                            android:textSize="20sp"
                            android:textColor="@color/white" />

                    </LinearLayout>
                </LinearLayout>
            </LinearLayout>
        </RelativeLayout>
    </ScrollView>

</LinearLayout>
Baca juga: Cara Setting Hostname DNS Pribadi di Android
5. Kode JAVA
Berikut ini adalah kode JAVA yang bisa Anda gunakan untuk mengatur setiap layout grid.
public class HomeActivity extends AppCompatActivity {
LinearLayout btn_contact, btn_message, btn_profile, btn_notification, btn_settings, btn_rate;
ImageView btn_menu;
@Override
protected void onCreate(Bundle savedInstanceState) {
super.onCreate(savedInstanceState);
EdgeToEdge.enable(this);
setContentView(R.layout.activity_home);
ViewCompat.setOnApplyWindowInsetsListener(findViewById(R.id.main), (v, insets) -> {
Insets systemBars = insets.getInsets(WindowInsetsCompat.Type.systemBars());
v.setPadding(systemBars.left, systemBars.top, systemBars.right, systemBars.bottom);
return WindowInsetsCompat.CONSUMED;
});
btn_menu = findViewById(R.id.btn_menu);
btn_contact = findViewById(R.id.btn_contact);
btn_message = findViewById(R.id.btn_message);
btn_profile = findViewById(R.id.btn_profile);
btn_notification = findViewById(R.id.btn_notification);
btn_settings = findViewById(R.id.btn_settings);
btn_rate = findViewById(R.id.btn_rate);
btn_menu.setOnClickListener(view -> Toast.makeText(this, "UIDashboard", Toast.LENGTH_SHORT).show());
btn_contact.setOnClickListener(view -> Toast.makeText(this, "UIDashboard", Toast.LENGTH_SHORT).show());
btn_message.setOnClickListener(view -> Toast.makeText(this, "UIDashboard", Toast.LENGTH_SHORT).show());
btn_profile.setOnClickListener(view -> Toast.makeText(this, "UIDashboard", Toast.LENGTH_SHORT).show());
btn_notification.setOnClickListener(view -> Toast.makeText(this, "UIDashboard", Toast.LENGTH_SHORT).show());
btn_settings.setOnClickListener(view -> Toast.makeText(this, "UIDashboard", Toast.LENGTH_SHORT).show());
btn_rate.setOnClickListener(view -> Toast.makeText(this, "UIDashboard", Toast.LENGTH_SHORT).show());
}
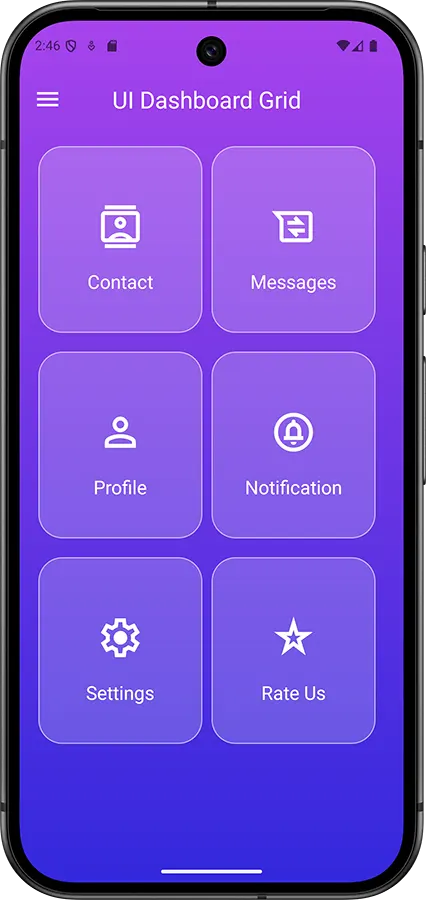
}Hasil akhir dari tutorial membuat UI dashboard grid sederhana adalah seperti berikut ini.
Demikian pembahasan kali ini mengenai cara membuat UI dashboard grid sederhana di Android Stuido. Anda bisa mengikuti tutorial sama persis seperti yang telah di bahas, atau Anda juga bisa mengambil kode yang di perlukan saja. Jika memiliki pertanyaan jangan sungkan untuk bertanya melalui komentar.